Installation
The hd EZ lock™ Universal Locking HDMI Adapter works with most HDMI Cables and most HDMI Components on the market and in most cases installs in minutes. Below is a short video demonstrating how to install hd EZ lock, as well as five typical installation scenarios. To see detailed installation instructions, click on the pictures or the “view details” link and it will take you to a detailed instruction page. If you have any questions or problems installing your product, please contact us and we will be happy to assist you.
To reduce the risk of electronic shock to yourself or others, or damage to your equipment, unplug your component from its power source before beginning to install hd EZ lock.

hd EZ lock Installation Video – Three Minute Video Showing Standard hd EZ lock Installation
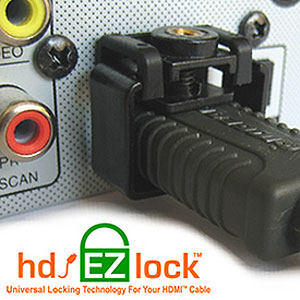
 hd EZ lock is the only Universal Locking HDMI Cable Adapter on the market. hd EZ lock secures your HDMI Cable in its input, eliminating loose HDMI Cables and intermittent or lost signals. hd EZ lock also eliminates harmful stress on your HDMI input, significantly reducing the chance of a damaged HDMI input or broken HDMI cable. The patent-pending hd EZ lock is manufactured in the USA.
This short, three minute video demonstrates a typical hd EZ lock installation using the screw above (or below) the HDMI Input. (view details)
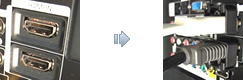
Method 1: Standard Installation – Using the existing Screw above your HDMI Input
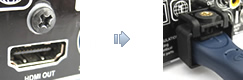
Use this method when your component’s chassis has an existing screw above your HDMI Input. This method works with various screw distances from your HDMI Input, and uses the screw to firmly attach your hd EZ lock to your component. (view details)
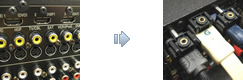
Method 2: Standard Installation – Fixing Screw below HDMI Input
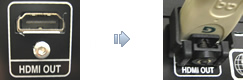
Use this method when your component’s chassis has an existing screw below your HDMI Input. This method works with various screw distances from your HDMI Input, and uses the screw to firmly attach your hd EZ lock to your component. (view details)
Method 3: Standoff Installation – Recessed Fixing Screw
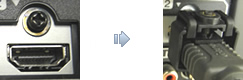
Use this method when the fixing screw above or below your HDMI Input is recessed and there is not enough surface area to attach the mounting adapter. This will extend hd EZ lock 3/8″ away from the surface, and secure your HDMI Cable firmly in place. (view details)
Method 4: Staggered Installation – HDMI Inputs Close Together
Use this method when you are installing hd EZ lock on several HDMI Inputs side by side but there is not enough clearance to place them next to each other. Staggering every other hd EZ lock will allow them to overlap to fit closer together. (view details)
Method 5: Adhesive Installation – No Fixing screw by HDMI Input
Use this method when your component’s chassis does not have a screw directly above or below the HDMI Input. Using the supplied VHB Adhesive, you are able to attach hd EZ lock directly to the chassis to hold your HDMI Cable firmly in place. (view details)