Method 5: Adhesive installation
– No Fixing screw by HDMI Input
Use the following installation method if you are installing hd EZ lock on an HDMI Input that has no screw above or below your HDMI Input. Use the supplied 3M Very High Bond (VHB) Adhesive to attach hd EZ lock to your component’s chassis. The preparation and application of the adhesive is extremely important. If these steps are not followed properly, the adhesive may not hold your hd EZ lock in place as intended.
To reduce the risk of electronic shock to yourself or others, or damage to your equipment, unplug your component from its power source before beginning to install hd EZ lock.

Prepare surfaces to apply adhesive.
Using the supplied IPA Prep Pads, thoroughly clean both the back of the Mounting Adapter and the area on your component where the adhesive will be applied. Dry with a clean cloth.
Preparation is very important for adhesive to work properly. Make sure surface is dry before proceeding. Do not touch either surface after cleaning.

Plug in your HDMI Cable and prepare to attach the Mounting Adapter.
Slide the Main Body over the end of your HDMI Cable. Plug your HDMI Cable into the HDMI Input.
Make sure the notches on the Main Body are facing away from the chassis.

Attach the Mounting Adapter the your component’s chassis.
Remove one side of adhesive lining and apply to the back of the Mounting Adapter. Apply firm pressure for 30-60 seconds. Remove second lining and apply the Mounting Adapter to the chassis, also applying firm pressure for 30-60 seconds.
Center the Mounting Adapter on your HDMI Cable and make sure the bottom of the Mounting Adapter is directly against the top of your HDMI Cable. For best results, allow the adhesive to sit for 24 hours before proceeding to the next step.
*See below for cure times.

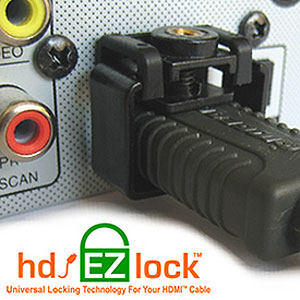
Insert the Main Body into the Mounting Adapter and tighten to complete your installation.
Slide the Main Body into the gap in the Mounting Adapter. Insert the included 6/32″ set screw into the threaded insert in the Main Body and, using your fingers to guide the Main Body, use the 1/16″ hex key to tighten the set screw tight enough to grip your HDMI Cable.
HDMI Cables 5/16″ high or less use the 3/8″ long set screw. HDMI Cables higher than 5/16″ use the 1/4 ” long set screw. Do not over tighten. Tighten until you feel resistance, then an additional two to three turns is enough to hold firmly in place.

Installation Complete. If Installing additional HDMI Cable, repeat steps 1 through 5.
It is possible to install the Mounting Adapter above OR below your HDMI Cable. This photo shows an example on a Samsung TV with both applications installed.
To install hd EZ lock with Mounting Adapter below your HDMI Cable, simply follow the steps above but place the Mounting Adapter against the bottom of your HDMI Cable.
* At room temperature, approximately 50% of the ultimate holding strength of the VHB Adhesive will be achieved after 20 minutes, 90% after 24 hours, and 100% after 72 hours.
Due to the wide variety of materials used to manufacture HDMI Cables and AV Components, your results may vary using the supplied adhesive. We have tested many VHB adhesives and from our experience we’ve determined that the supplied adhesive is the best “all around” adhesive. If the adhesive does not adhere to your components properly, please make sure that you have prepared your surfaces properly and allowed 24 hours or more for the adhesive to cure before applying pressure.
If you still experience problems after following these steps, please contact us for further assistance.
 Download Quickstart Guide